
At about 11 p.m., a staging server crossed 82 percent disk usage on / and kept climbing.
It was an Ubuntu 24.04 VM running inside UTM on a forever-online Mac. The culprit was familiar: a CI pipeline quietly hoarding Docker layers until the disk had almost no room left.
The fix looked like the kind of thing that should take two minutes. Open UTM. Find the VirtIO drive. Drag the slider from 100 GB to 150 GB. Click Resize. Restart the VM.
Then I SSH-ed in and ran the command every sysadmin reaches for first:
df -h /
The output was merciless:
Filesystem                         Size  Used Avail Use% Mounted on
/dev/mapper/ubuntu--vg-ubuntu--lv   60G   49G   10G  82% /
Sixty gigabytes.
Not 150. Not even 100. Linux was still living inside the old world.
That is the part most disk-resize guides hide in the fine print. You do not resize “the disk.” You resize a stack. Each layer has its own idea of size, and none of them politely updates the next one for you.
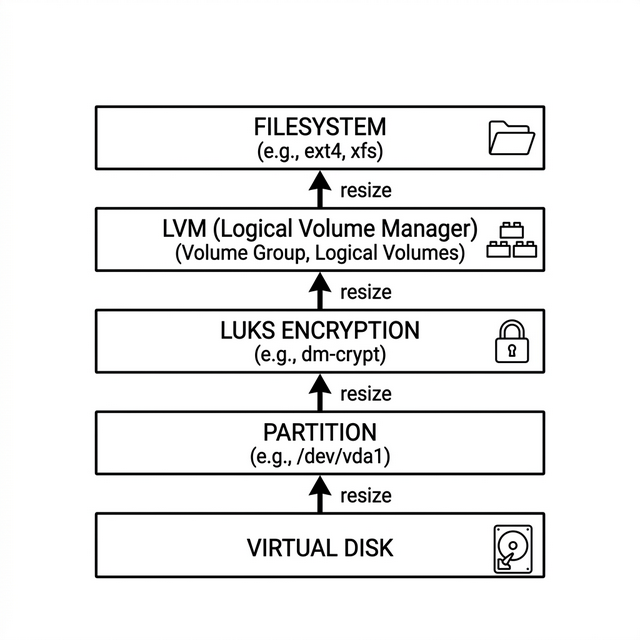
Storage Is a Stack, Not a Slab
The VM disk is only the bottom layer.
On a modern Linux system, especially one with encryption and LVM, storage is a stack of block devices and metadata. In my case, the stack had five distinct layers:
┌─────────────────────────────────────┐
│  Layer 5: ext4 Filesystem           │  ← Your files live here
├─────────────────────────────────────┤
│  Layer 4: LVM Logical Volume        │  ← A flexible "virtual partition"
├─────────────────────────────────────┤
│  Layer 3: LVM Physical Volume       │  ← Raw material registered with LVM
├─────────────────────────────────────┤
│  Layer 2: LUKS Encryption           │  ← Full-disk encryption container
├─────────────────────────────────────┤
│  Layer 1: Partition (vda3)          │  ← A defined region of the disk
├─────────────────────────────────────┤
│  Layer 0: Virtual Disk (vda)        │  ← The raw .qcow2 file from UTM
└─────────────────────────────────────┘
When I resized the drive in UTM, I changed Layer 0. Every other layer still carried metadata from the original 60 GB installation. An earlier extension to 100 GB had produced no useful space either. I had missed that until the server was already close to full.
Each layer only trusts the layer directly below it. You have to grow them from the bottom up.
Layer 1: Move the Partition Boundary
First, prove that the kernel sees the larger virtual disk:
lsblk
NAME                        MAJ:MIN RM   SIZE RO TYPE  MOUNTPOINTS
vda                         253:0    0   150G  0 disk
├─vda1                      253:1    0     1G  0 part  /boot/efi
├─vda2                      253:2    0     2G  0 part  /boot
└─vda3                      253:3    0  60.9G  0 part
  └─dm_crypt-0              252:0    0  60.9G  0 crypt
    └─ubuntu--vg-ubuntu--lv 252:1    0  60.9G  0 lvm   /
vda shows 150 GB. Good.
vda3, the partition that contains everything important, is still stuck at 60.9 GB. That means the extra space exists, but no partition owns it.
A partition is a region on a disk with a start byte and an end byte recorded in the partition table. GPT, in this case. When Ubuntu was installed on a 60 GB disk, the installer created vda3 starting at sector 6,397,952 and ending at sector 134,215,679. That end boundary was still anchored to the old disk size.
The 87 GB gap between the end of vda3 and the end of vda was unclaimed space.
The fix:
sudo growpart /dev/vda 3
CHANGED: partition=3 start=6397952 old: size=127817728 end=134215679
                                    new: size=308174815 end=314572766
growpart is a narrow tool with one job. It reads the partition table, identifies that partition 3 is the last partition on the disk, and extends its end boundary to the last usable sector. No data is moved. No filesystem is touched. It only rewrites a few bytes of metadata in the GPT header.
This is just moving the fence. The land inside is still undeveloped.
Layer 2: Grow the LUKS Container
This is the layer I forgot at first: full-disk encryption with LUKS.
LUKS works by wrapping the entire partition in an encryption container. It stores a header at the beginning of vda3 that includes the master key (itself encrypted with your passphrase), cipher configuration, and — critically — the size of the encrypted payload area. Even though the partition underneath had grown, the LUKS header still declared the encrypted region as 60.9 GB.
Everything inside LUKS — the LVM layer, the logical volume, the filesystem, your files — is encrypted. The kernel presents the decrypted data as a virtual device at /dev/mapper/dm_crypt-0. But that virtual device was still sized according to the old LUKS metadata.
The fix:
sudo cryptsetup resize dm_crypt-0
This command required the LUKS passphrase, which is separate from the user password. cryptsetup updated the LUKS metadata to declare the full partition as the encrypted area, and the kernel immediately resized the /dev/mapper/dm_crypt-0 device.
On my first attempt, I skipped straight to pvresize and got a confusing error about the physical volume already being at maximum size. The error was technically true from LVM’s point of view. It could only see the decrypted device LUKS exposed to it, and that device was still 60.9 GB.
The LUKS layer was blocking everything above it from seeing the new space.
If your system uses LUKS, check it early. It sits quietly between the partition and LVM, and its size mismatch produces errors that point you in the wrong direction.
Layer 3: Update the LVM Physical Volume
With the partition grown and the LUKS container expanded, LVM finally had a larger device underneath it. But LVM still had its own old metadata.
LVM operates on three abstractions:
- Physical Volume (PV): A raw block device registered with LVM. In my case, the decrypted LUKS device.
- Volume Group (VG): A pool that aggregates one or more PVs into a single logical storage pool. Mine is called
ubuntu-vg. - Logical Volume (LV): A virtual partition carved from the VG. Mine is
ubuntu-lv, mounted at/.
The PV still believed it was 60.9 GB. It was sitting on a decrypted device that was now 146.9 GB, but LVM does not automatically turn that into usable extents.
The fix:
sudo pvresize /dev/mapper/dm_crypt-0
Physical volume "/dev/mapper/dm_crypt-0" changed
1 physical volume(s) resized or updated / 0 physical volume(s) not resized
pvresize scanned the underlying device, noticed it was now ~86 GB larger, and added those bytes to the PV as free physical extents (4 MB chunks, by default). These free extents became available in the Volume Group.
This step updates the ledger. The storage exists. LVM now admits it exists.
Layer 4: Assign Space to the Logical Volume
The Volume Group ubuntu-vg now had ~86 GiB of free space. The Logical Volume ubuntu-lv, where the filesystem actually lives, still used only 60.93 GiB.
The fix:
sudo lvextend -l +100%FREE /dev/ubuntu-vg/ubuntu-lv
Size of logical volume ubuntu-vg/ubuntu-lv changed from <60.93 GiB
  (15598 extents) to <146.93 GiB (37614 extents).
Logical volume ubuntu-vg/ubuntu-lv successfully resized.
The -l +100%FREE flag is the key: it says “take every last free extent in the Volume Group and give it to this Logical Volume.” You could also specify a fixed size (e.g., -L +80G) if you wanted to leave some free space for snapshots or other volumes.
This is the moment the free space becomes part of /dev/ubuntu-vg/ubuntu-lv. It still is not part of the filesystem.
Layer 5: Grow ext4
This is the layer users actually experience.
The ext4 filesystem organizes files into directories, tracks permissions, handles journaling for crash recovery, and maintains the bitmaps that know which disk blocks are free or full.
ext4 stores this information in structures called block groups, each containing an inode table and a block bitmap. When the filesystem was created during installation, it built exactly enough block groups to cover 60 GB. The Logical Volume underneath could now be 150 GB — ext4 would not use a single extra byte until told to expand.
The fix:
sudo resize2fs /dev/ubuntu-vg/ubuntu-lv
resize2fs 1.47.0 (5-Feb-2023)
Filesystem at /dev/ubuntu-vg/ubuntu-lv is mounted on /; on-line resizing required
old_desc_blocks = 8, new_desc_blocks = 19
The filesystem on /dev/ubuntu-vg/ubuntu-lv is now 38516736 (4k) blocks long.
Two details matter. First, this ran online while / was mounted and serving I/O. Second, it finished in under a second. No reformatting. No data migration. Just filesystem metadata expansion.
The Proof
After all five layers were resized, the moment of truth:
df -h /
Filesystem                         Size  Used Avail Use% Mounted on
/dev/mapper/ubuntu--vg-ubuntu--lv  145G   50G   90G  36% /
From 82 percent usage down to 36 percent. Ninety gigabytes of free space. No reboot. No downtime. The CI pipeline that had been quietly filling the disk resumed without ever knowing there had been a problem.
You Will Need This
Disk expansion is routine infrastructure work.
Development VMs Outgrow Their Allocation
Every developer who uses local VMs — UTM, Parallels, VirtualBox, QEMU — eventually runs out of disk. Node modules pile up. Docker images pile up. Logs pile up. Recreating the VM is punishment for not knowing the stack.
Cloud Instances Need Room to Breathe
AWS EBS volumes, Google Persistent Disks, and Azure Managed Disks can all be resized through their respective consoles or APIs. But the cloud provider only changes the block device — the same five layers (minus LUKS, usually) still need to be expanded inside the instance. AWS even documents this in a dedicated guide, but it is one of the most frequently asked support questions on every cloud platform.
Database Servers Hit Storage Limits
PostgreSQL WAL files, MySQL binary logs, MongoDB data directories: databases eat disk aggressively. When a production database approaches capacity at 2 a.m., the person who can expand a volume without taking the database offline is suddenly very valuable. The resize2fs online capability exists for this kind of pressure.
CI/CD Build Servers Fill Themselves
Build servers accumulate artifacts, Docker layers, compiler caches, and coverage data. A Jenkins or GitLab Runner VM that runs 50 builds a day can fill a 100 GB disk in weeks. Expand the storage and keep the pipeline moving.
Home Labs Grow Quietly
Nextcloud, Jellyfin, Home Assistant, backups, photos, surveillance footage: self-hosted services always want more disk eventually. The same technique works whether the VM lives on a Mac Mini or a rack-mounted Proxmox server.
Encrypted Laptop Partitions Add One More Trap
Full-disk encryption with LUKS is standard on most enterprise Linux laptops. When IT replaces a 256 GB SSD with a 1 TB drive during a hardware refresh, the same five-layer expansion is required — with the added pressure that this is someone’s daily workstation and they need it back immediately.
The Commands
The complete procedure:
# 1. Expand the partition to fill available disk space
sudo growpart /dev/vda 3

# 2. Expand the LUKS encryption container (skip if unencrypted)
sudo cryptsetup resize dm_crypt-0

# 3. Tell LVM the physical volume is larger
sudo pvresize /dev/mapper/dm_crypt-0

# 4. Extend the logical volume to use all free space
sudo lvextend -l +100%FREE /dev/ubuntu-vg/ubuntu-lv

# 5. Grow the filesystem to fill the logical volume
sudo resize2fs /dev/ubuntu-vg/ubuntu-lv
If your system does not use LUKS, skip step 2. If it does not use LVM, skip steps 3 and 4 and run resize2fs directly on the partition. If the filesystem is XFS instead of ext4, replace resize2fs with xfs_growfs /.
The Real Lesson
The surprise comes from the wrong mental model.
You think you “have a 150 GB disk.” Linux sees a virtual disk, a partition, an encryption container, a physical volume, a logical volume, and a filesystem. Each layer is excellent at its own job. Each layer keeps a clean boundary. None of them assumes that a size change below it should automatically mutate the layer above it.
That is the price of modularity.
The same modularity lets you encrypt one volume and not another, span a Volume Group across physical disks, and resize ext4 online without unmounting /. The cost is that when the bottom grows, you must propagate the growth upward yourself.
At 11:47 p.m., resize2fs finished in 0.8 seconds. df -h finally showed 145 GB. The pipeline recovered. The machine had not needed drama. It had needed every layer told the truth.